To start working with Testlum, you need to create a directory with your project's resources which will contain the main folders of your directory and global-config- file with global configuration settings for your project. As Testlum requires the presence of mandatory folders that must be in the structure of your resources, these folders will contain the data for testing, and the test scenarios themselves.
- config
- data
- locators
- report
- scenarios
Config folder is used to keep different configurations for your environment. There are 2 XML files in this folder:
- integration.xml
- ui.xml
integration.xml - file, where you can set up all integrations you need (API, Websocket, DBs, etc).
For instance:
<integrations xmlns:xsi="http://www.w3.org/2001/XMLSchema-instance" xmlns="http://www.knubisoft.com/cott/testing/model/global-config" xsi:schemaLocation="http://www.knubisoft.com/cott/testing/model/global-config global- config.xsd"> <apis> <api alias="api" url="http://localhost:8073/" enabled="true"/> <api alias="zipCode" url="https://api.zippopotam.us/us/" enabled="true"/> <api alias="catFacts" url="https://catfact.ninja/" enabled="true"/> </apis> <websockets> <api alias="TESTER" url="ws://localhost:8080/ws-app" protocol="stomp" enabled="true"/> <api alias="KRAKEN" url="wss://ws.kraken.com" protocol="standard" enabled="true"/> <api alias="DISABLED" url="http://example" protocol="standard" enabled="false"/> </websockets> <postgresIntegration> <postgres alias="playground_db" enabled="false"> <jdbcDriver>org.postgresql.Driver</jdbcDriver> <username>playground</username> <password>playground</password> <connectionUrl>jdbc:postgresql://localhost:5433/playground_db</connectionUrl> <schema>public</schema> <hikari> <connectionTimeout>45000</connectionTimeout> <idleTimeout>60000</idleTimeout> <maxLifetime>180000</maxLifetime> <maximumPoolSize>50</maximumPoolSize> <minimumIdle>5</minimumIdle> <connectionInitSql>SELECT 1</connectionInitSql> <connectionTestQuery>SELECT 1</connectionTestQuery> <poolName>core-postgres-db-pool</poolName> <autoCommit>true</autoCommit> </hikari> </postgres> </postgresIntegration> </integrations>As you see, you are able to integrate as much APIs, Websockets and DBs as you need at once.
ui.xml -file, where you can set up browsers for Web UI testing that you need, including web, mobile and native applications.
<uiConfig xmlns:xsi="http://www.w3.org/2001/XMLSchema-instance" xmlns="http://www.knubisoft.com/cott/testing/model/global-config" xsi:schemaLocation="http://www.knubisoft.com/cott/testing/model/global-config global- config.xsd"> <web enabled="true"> <baseUrl>https://google.com</baseUrl> <browserSettings> <takeScreenshots enabled="true"/> <elementAutowait seconds="3"/> <browsers> <chrome alias="chrome_0" enabled="true" maximizedBrowserWindow="false" headlessMode="true"> <browserType> <localBrowser/> </browserType> </chrome> <firefox alias="firefox_0" enabled="false" maximizedBrowserWindow="false" headlessMode="true"> <browserType> <localBrowser driverVersion="0.31.0"/> </browserType> </firefox> </browsers> </browserSettings> </web> <mobilebrowser enabled="true"> <takeScreenshots enabled="false"/> <elementAutowait seconds="5"/> <baseUrl>http://10.0.2.2:4000</baseUrl> <connection> <appiumServer> <serverUrl>http://127.0.0.1:4723/wd/hub</serverUrl> </appiumServer> </connection> <devices> <device alias="android_pixel_5" platformName="android" enabled="true"> <appiumCapabilities> <deviceName>Pixel 5 API 31</deviceName> <platformVersion>12.0</platformVersion> <udid>emulator-5554</udid> </appiumCapabilities> </device> </devices> </mobilebrowser> <native enabled="true"> <takeScreenshots enabled="false"/> <elementAutowait seconds="5"/> <connection> <appiumServer> <serverUrl>http://127.0.0.1:4723/wd/hub</serverUrl> </appiumServer> </connection> <devices> <device alias="android_pixel_5_N" platformName="android" enabled="true"> <appiumCapabilities> <deviceName>Pixel 5 API 31</deviceName> <platformVersion>12.0</platformVersion> <udid>emulator-5554</udid> <appPackage>com.todoist</appPackage> <appActivity>com.todoist.alias.HomeActivityDefault</appActivity> </appiumCapabilities> </device> </devices> </native> </uiConfig>Folder data - root folder for test data (used to store datasets and files for migration, in various formats).
Inside this, you also have the option to separate your test files into separate folders for a readable structure and ease of use.
When you first start Testlum, inside the "data" folder, we left the default folder "variations" for storing test data, which you can change in the future.
You can create folders inside data:
- credentials
- javascript
- patches
- variations
credentials - Folder for storing system user data for authorization within the test scenario.
xxxxxxxxxx{ "password": "Qwerty12@", "username": "test@gmail.com"}javascript - Folder to store JS files for <javascript> command that uses these files.
xxxxxxxxxxconst link = document.querySelector('a[href="/tables"]');link.click();patches - Folder to store datasets for testing ( sql, csv, javascript, xlsx, partiql, bson, shell and others).
xxxxxxxxxxINSERT INTO t_role (id, name, description, enabled)VALUES (1, 'ADMIN', 'Owner company', true), (2, 'USER', 'Admin company', true), (3, 'SUPERUSER', 'Lawyer company', true);variations - Folder in which a data set is created and stored for interacting with the WEB (in the format csv).
xxxxxxxxxxfirstName,lastName,country,state,email_address,password,repeat_passwordJohn,Jarlet,Canada,Manitoba,mobilebrowser+7@gmail.com,Qwerty12@,Qwerty12@Locators - folder, where element locators are stored (For interaction with WEB).
Inside of locators folder should be such folders as:
component- a folder for storing locators that refers to thefooter, andheaderelements of the pages. (It is recommended to separate these locators for structuredness and ease of use)pages- a folder in which the locators of a particular page are stored
(In the xml file with locators, which is located in the pages folder, it is possible to request the desired footer and header component using the command: <include>).
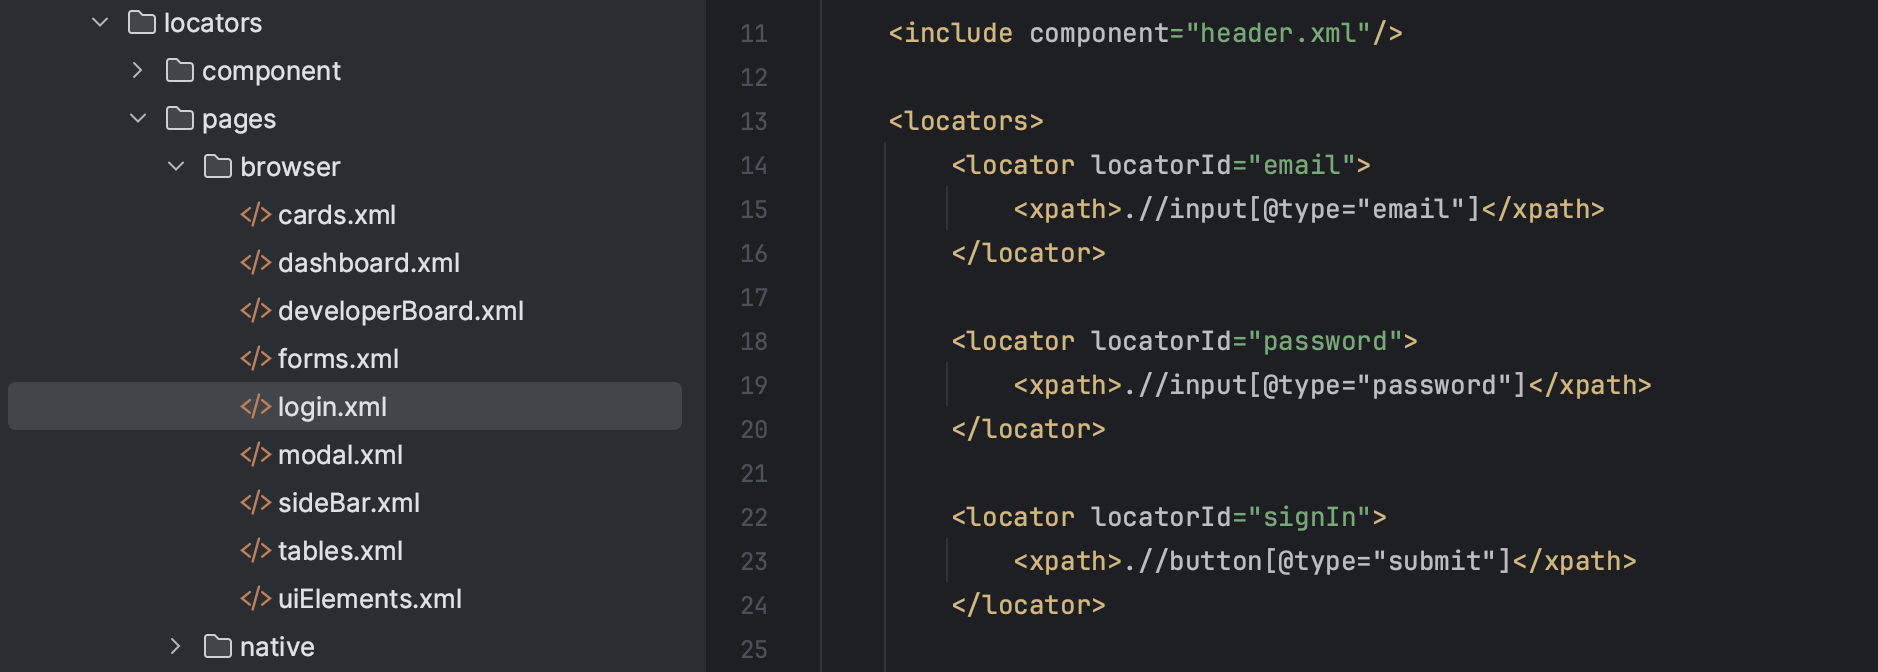
xxxxxxxxxx<page xmlns:xsi="http://www.w3.org/2001/XMLSchema-instance" xmlns="http://www.knubisoft.com/cott/testing/model/pages" xsi:schemaLocation="http://www.knubisoft.com/cott/testing/model/pages pages.xsd"> <details> <name>customLocators</name> <url>google.com</url> <description>Simple web test</description> </details> <include component="header.xml"/> <locators> <locator locatorId="banner"> <xpath>.//img[@class='img-fluid']</xpath> </locator> <locator locatorId="inputPassword"> <xpath>.//input[@name='password']</xpath> </locator> </locators> </page>This way we will be able to pass locators that are in the component folder to the scenarios through the xml file pages.
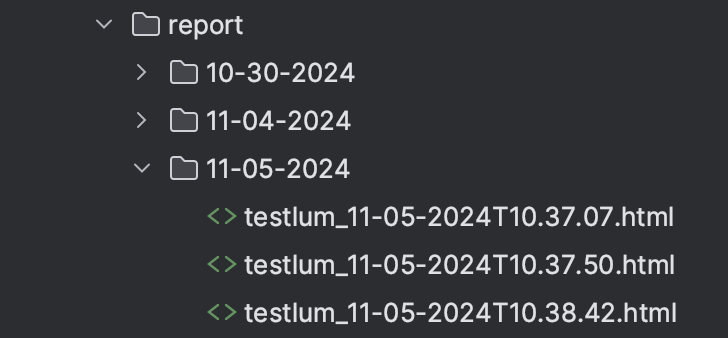
Report - Folder in which the test report will be generated and divided by the date where the test pass report will be generated.
Scenarios - Folder for creating and storing test scenarios.
xxxxxxxxxx<scenario xmlns:xsi="http://www.w3.org/2001/XMLSchema-instance" xmlns="http://www.knubisoft.com/cott/testing/model/scenario" xsi:schemaLocation="http://www.knubisoft.com/cott/testing/model/scenario scenario.xsd"> <overview> <description>Demonstration of the work of the 'click' tag</description> <name>Click</name> </overview> <settings> <tags>web</tags> </settings> <web comment="Start WEB scripts"> <navigate command="to" comment="Go to base page" path="/category/business"/> <wait comment="Wait for timeout scenario" time="2"/> <click comment="Click on 'Computer Book' tab" locatorId="click.computerBookClick"/> <wait comment="Wait for timeout scenario" time="1"/> </web> </scenario>